picalili

picalili

Tuesday, 22 October 2013

Chapter 11 Disintegrating stitches


Following my feedback from Sian, I will return to the disintegrating papers and stitching but firstly a few photos of the reverse of the disintegrated stitched samples.


All the samples are the same size but for some reason the ipad doesn't seem to thinks so. It's quite interesting looking at the back of these hand stitched pieces, not something I had considered before. I am sure traditional hand embroiderers would be horrified at the tangled mess at the back of my work though!!


Disintegrated designs grouped together


Sian also suggested going back to the stitched circles and trying to create star like shapes by overlapping the circles.

First attempt....


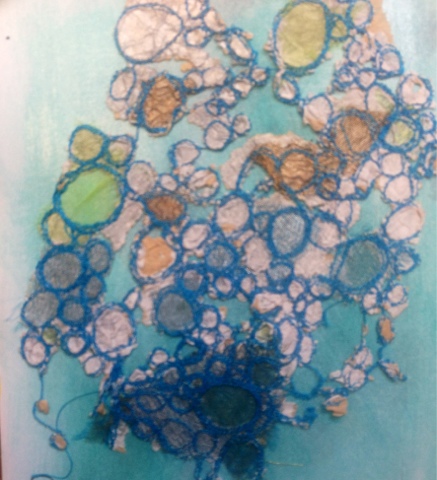
Circles drawn onto one sheet of brown paper,were then machine stitched
Here's the result after some stitching.

Then I decided to add some water. Big mistake golden rule when making lace like fabric....join all shapes. Here's the result,so back to the drawing board.
Messy and not what I wanted at all.

Attempt number two
This time I used smaller circles and more of them.


Now to add some machine stitching.


Reverse side


I then added some oil and rubbed at it until it started to disintegrate. This took some time because I had used 2 pieces of brown paper to support all the stitching. Here's the finished piece, I think next time I would go with one piece of paper and water rather than the oil or another option could be to oil the paper first and then stitch into it.... Maybe


Wednesday, 16 October 2013

Chapter 11 resolved sample growth and disintegration paper samples


A. Paper was crumpled until it began to disintegrate. The paper becomes quite soft during this process


B. paper was first crumpled and then the edges were burnt using a candle. I worked right next to the window while doing this. It gives a good aged look to the paper but not the safest!


C. Disintegration is achieved using a hole punch, it created quite an even pattern to begin with, but by folding it in various ways I was able to make it look a little more organic than it did originally.


D. Simple tearing only.


E. Stabbed with a pencil.


F. Crumpled paper was rubbed up and down a cheese grater.


G. Momigami (from Cas Holmes book The Found Object). Oil applied to paper which is then kneaded in the hands until it becomes much softer but also much stronger. There are a few small tears beginning to appear in the piece,although they don't show up well in the picture above.


H. An even grid was stitched onto brown paper,soaked in water an distressed.


I. This time I tried an uneven grid,lots of free machining in all directions, making sure that the areas were all connected.


J. Brown and sprayed silver paper layered,small pieces of sheers were incorporated as I free machined. I found it easy to work in circles for this type of exercise but it doesn't fit with this module. However I loved doing this and I am sure I will return to it again as the course progresses.


K. Going right back to my original line drawings I had wanted to use the poppy shape and felt I should try it out on a paper sample. Firstly I created a grid of circles and then using free machining in zig zag and straight stitch I created poppy like patterns within each circle. The piece was then soaked in water and distressed. While it was still wet I added some koh-i-noor dye into the middle of the poppy seed head shapes. It was the left to dry.

SECOND THOUGHTS-paper shapes
First of all I tried to make a poppy seed head shape to disintegrate but this was too complex

I felt this would be to complicated to work with so after looking back through my samples and work sheets I found a much simpler shape that I have used several times. "Keep it simple" I had been told that before by Sian at the beginning of this module. After drawing the same shape onto the back of each square I "cut"out the shape by tearing it. Here is the series I created I love the last highly disintegrated shape.


THIRD THOUGHTS - different ways of disintegrating a square of fabric.


Top left: snips into the middle of the fabric in cross shape frayed.
Top right: holes made with scissors are the pulled apart and threads removed.
Bottom left: 8 point star cut with scissors and then frayed.
Bottom left simple cross shape frayed.

Summarising different ways of making a shape disintegrate or grow. I decided to see how I could make a simple star shape look as if it was disintegrating by using only hand stitches.


1. I used a variety of hand dyed and bought threads to work long and short stitches to cover the whole shape and raise the surface too.


2. Straight stitches used again but gaps left to give the illusion of disintegration.


3.French knots were stitched randomly around the edge of the shape with only a few added into the shape.


4. The shape was stitched in long stitched held down by stitching and then cut through.


Monday, 19 August 2013

New or rather the not so new Chapter 10 Making ripples 'chenille' orslashed reverse applique.

Thanks for the feedback Sian I know that I have taken so long to complete this first module but I can't believe it's over a year! What's more module 10 has changed, Sian said I could skip this if I wanted but I thought it looked like fun, also it looks tricky  and again something I had ever done so here goes...  I am doing this course to learn as much as I can.So thanks Sian another new technique to add to my ever increasing stitching vocabulary.

Chenille sample.


6.layers of fabrics were used in this sample however only the top layer frayed well. Note to self next time used more cotton rather than synthetics and silks.

Melting. 
I had a quick go at this optional section of chapter 12.

Test 1.
Strips of fabric tested to see which melted best. I was surprised by the grey and dull blue strips as I thought all these fabrics would melt easily with the soldering iron. These two had marks indented into the rather than melting right through. Quite a good effect though.


Test 2.
A florist friend of mine gave me some florist paper,which looks very much like light weight lurador. I decided to see what would happen if I used the soldering iron on this.
Firstly I painted the material with watered down acrylics. In this test I put 2 squares of  different colours together an go to work with the soldering iron, cutting ot shapes from one layer,burning holes right through and using the soldering iron to make marks the edges were cut out using the soldering iron in various ways. This material could be stitched into too.


Test 3
Playing around with more paper. The top. 2 pieces show the two colours I used. The second 2 are single pieces with one single shape cut using the soldering iron. I loved this material as it was easy to colour and worked well with the soldering iron too.


Translating a design using a soldering iron.

6 layer of sheers,painted florist paperand synthetic fabrics were used in this sample. The soldering iron was used to make marks and cut away various layers.
The top layer is painted florist paper which I knew reacted well to being soldered.


Friday, 9 August 2013

Chapter 10 interchange sample

I forgot to put these photos in the last post here are the prepared backgrounds ready to cut out a third and different star shape, also the shapes used from my black cut shapes.


These shapes were applied to two plain felt squares.


Here's the shape I am going to cut out of both and swap them around. I seem to keep coming back to the same star shape.


Sunday, 21 July 2013

Chapter 10 simple countercharge sample 1

Sample 1simple countercharge


Cream felt was decorated with silk,scrim and sheer fabric. The blue felt with bonded snips of silk. A simple cross shape was selected from the coloured paper exercise. 
In sample a I used a fagot insertion stitch around the cross and then used alternating long and short blanket stitching to edge it.
In sample b the cross was stitched using simple antique insertion stitch and then edged with regular blanket stitch.

Sample 2  countercharge


When I was cutting the first triangular shapes out I must have turned the template over as the shapes were not all the same size. So I had to do a bit of cutting to get this sample to work. I am quite pleased with the final result though.
 I used 4 different bonded felt pieces. The brown piece is an oiled scrunched magazine page. The orange piece is bonded with scrim and lace, as is the lighter blue piece. The last piece is fabric snips and sheers which I heated with a hot air gun to create texture,finally acrylic paint was applied. The last piece was quite difficult to stitch through so the stitching was quite uneven.

Sample 3 complex counter sample


Two different shapes were bonded onto commercial felt and then a 3rd star shape was cut out
Sample 1 has been stitched using a herringbone type of insertion stitch, a running stitch was then applied round the inside and outside of the bonded shape.
Sample 2 is stitched using simple insertion stitch.

Tuesday, 2 July 2013

Chapter 10 module 1 Inlay appliqué

Sample 1


Traditional hand stitched insertion stitched on bonded felt sections.

Sample 2 

I am not sure if this can be really classed as insertion stitching but while browsing on line I came across fabric artist Susan Lenz 
And thought I would try a version of her technique as a sample.


A4 piece of black felt with painted solufix (my local shop didn't have bondaweb in stock). Pieces of polyester fabric an nylon lace applied in squares and rectangles were then fixed onto the background fabric. Crystal organza was then applied to make stitching easier. Machine stitched stars and crosses worked within the squares and rectangles were all linked using straight machine stitching.


 2a.Detail of some stitching.


2b detail of linked shapes


2c,d, e and f. I then used the soldering iron (in a well ventilated room) to "cut away" the excess fabric.


2g the whole piece.

I went off at a bit of a tangent here but thoroughly enjoyed the process.