picalili

picalili

Tuesday, 16 August 2016

How quickly time flies by. module 2, chapter 5 revisited August 2016.

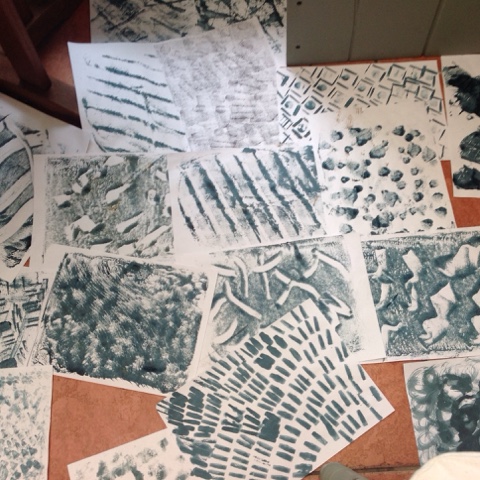
I can't believe it's been such a long time since I posted or completed any course work! I thought I would revisited chapter 5 making patterned papers as I couldn't find the papers I had created before. So set up with brusho, ink and wall paper paste I spent a good 2 hours creating lots of patterned papers ready for future chapters.


I hope I have a wide enough selection of tones and patterns for all the exercises in future chapters.
Now to get the fabrics prepared. After my feedback from Sian I have been looking at alternative methods of dying. I quite fancied natural dyes but you still need mordants and fixatives and lots of the plants used are poisonous and require careful handling incase of allergic reactions. So I have decided to keep going with the procion dyes I have used before, but I will be avoiding the use of bleach as this does affect my skin quite badly. I also have everything else I need here already.

My last attempt at dying was not a great success, but after re reading the chapter I can see why, I had submerge the shibori and the tie dye pieces into the dye bag rather than dipped and painted it on. I ended up with dark grey pieces of fabric with very little pattern on some and none on others. So it's time to start again. Oh well that means a few happy hours hand stitching which I love.

Thank you Sian for the email message, it has given me the boost I needed to pick things up and get motivated again.


Friday, 16 October 2015

Chapter 6Preparing fabrics to dye

Having read through the chapter. I decided to make a resist to paint over a piece of cotton, so I mixed flour and water to create a simple paste and painted it quite thickly onto the fabric. I tried to take a picture of the process, not a particularly easy task!


Once this has dried completely I will scrunch it thoroughly in the hope it will look like elephant skin once dyed. We'll see

Next I stitched two pieces of fabric to create  Tritik Shibori pieces, one with straight running stitches and the other with zig zagged stitching. it will be interesting to see the results once the pieces are gathered up and the dye applied.
 

Next simple Arashi Shibori tied and ready for the dyes to be dripped on
 

various methods of tie dye
 

Nowhere locally stocks procion dyes so I am waiting for my mail order to arrive, then I can start dyeing. While looking at dyes on the internet I came across a textile artist called India Flint and was interested in her approach to dyes and dyeing. I don't think it would work for this project as we  have to focus on black and white, but I fancy having a go at her Eco dyeing. I have struggled in the past using commercial dyes as I often have bad allergic reactions to chemicals so her approach to dyeing could be a way for me to try gentler colouring methods.
 
 
India Flint with a large piece of eco dyed fabric.

 
detail from a piece by India Flint called Seven Sisters.


Monday, 12 October 2015

Chapter 5 module 2 patterned papers

sIn this chapter we are asked to produce a series of printed papers based on our research and animal sketches from the previous chapters.
I produced a mixed batch of papers using mono printing and printing on white and black paper, I haven't been able to get hold of any black tissue paper but once I get some I will have a go at using bleach to create patterns.

Mono printing using pieces of tomato puree tube with pencil etchings to create animal patterns


printing using bubble wrap, tomato puree etchings, dry sponge dipped in paint and corks


More printing


I really enjoyed this exercise once I got going and have achieved some good results which should translate well onto fabric.


Friday, 11 September 2015

machine strips and Chapter 4 Drawings from animal markings

Can't believe it's been so long since I last posted anything here. Things have been pretty busy and so the course work had to be put on hold. But I am back and hopefully able to stick at it more regularly from now on.
I started by making 3 stitched strips to get me back into the swing of things

1) Zebra markings on a single piece of fabric using varying length of zigzag stitch and free motion stitching.

 
2) Snake skin strip, this was free machining without taking the needle off at all, I feels looks more like pebbles than snake skin, but it was good to practise again.


3) Butterfly wing strip using straight stich and varying length zig zag stitch


Chapter 4 Drawings from animal markings
 
1) Butterfly wing with close up details. I will do the pencil ones again as they don't show up very well once scanned, the edges are quite lace like. I love the fact some of the markings look like hearts. using a mix of pencil and ink has created the best sketch result  


2) Sea Urchin again the pencil markings are not showing up enough on these sample so I will go over then with pen and add the images
 
I thought I would have a quick warm up session before continuing, so looking at the drawings from the module I made some quick drawings, using a uniball pen instead of a pencil gives better definition once scanned
 
 
Feathers
Top  left hand is felt pen lines looking at the whole photo. Top right uses shaped paper cut outs to mask areas which were worked over with charcoal. Bottom left is one of the cut outs. This method could be used for other markings too.

 Goldfish


There are lots of areas of this drawing that could be looked at for shapes and patterns.
 
Butterfly reworked


Sea urchin reworked in felt pen


close up of the Sea Urchin


Snakeskin


Friday, 17 October 2014

Module 2 chapter 3 stitched strips

following my latest feedback from Sian, I have created some blocks of stitching rather than strips.

sample a: Butterfly wing as inspiration

Black thread top and bottom, zig zag and straight stitch with dog feed up. Sian suggested giving this a try and I am pleased with the resulting piece. it has the delicacy of a butterfly wing but as a design rather than trying to replicate the pattern exactly.
.

Monday, 29 September 2014

Module 2 chapter 3 machine stitched strips

Befor I start stitching I decided to have a go at drawing from some of the animal mark photos I had collected


A.Butterfly wing


B.Zebra skin


C. Snake sk


D. Cheetah skin


Now to make a few strips.


Friday, 26 September 2014

Module 2 Chapter 3 cable stitch effect

So with my un-tensioned bobbin case hand wound onto the bobbin I tried out this effect for the first time. Apart from not being able to see what you are producing this is a great technique and was really pleased with the 3 samples I made.


Sample i, straight stitch 


 Sample ii, straight stitch

 
Sample iii using zig zag